Sunday, June 19, 2016

Shopkins Shorts

It is starting to get hot where I live.  Today was about 107 in fact.  My girls had outgrown most of the shorts they had from last summer.  So, I decided to make them some rather then buy ill fitting shorts at the store.  I have many shorts patterns but I wanted something different than what I already had.  I went searching on etsy and pinterest for a shorts pattern I had envisioned (flat front, pockets and not short shorts).  I found the perfect one through Pinterest and that is the Little Honeybuns Shorts from Pattern Emporium.  As a bonus, they are an Australian company and their dollar is weak compared to USD right now making this pattern super affordable as well!

One of the reasons I choose this pattern is that there are several options.  This makes this pattern an even better deal!  There are 3 different lengths (sporty, play and bermuda).  They have a flat front with elastic back with an option for adjustable elastic.  Some of the other options include back pockets, back flaps, cuffs, tabs, belt loops and sash.

I choose to make the play length.  I made it simple to start out with and did minimal options.  On the next pair I plan to do cuffs and maybe back pockets.


This is a size 9 for my 9 year old daughter that loves Shopkins.  I just got 4 new Shopkins fabrics in the shop a few weeks ago.  This one is called Bags of Fun.  Another great thing about this pattern is that it only took 1 yard of fabric so they were pretty inexpensive to make.  Now lets talk about pockets.


This pattern does the front pockets in a way I have never seen before.  Instead of there being 2 pieces (pocket and lining) the pocket is one piece.  I thought this was genius and it made it simple and quick.  I trimmed the pocket opening in bias made with Fairy Frost in Fancy.  It really picks up the purple colors in the fabric and matches perfect with the tank top she will wear with this that I bought at Target.


Here is the back of the shorts.  There is a back yoke and elastic in the waistband.  The only thing I did different from the pattern directions was how I sewed the waistband.  The first pair of shorts that I made I followed the directions and found it difficult to sew the back waistband after inserting the elastic.  So, with this pair I top stitched/sewed the back waistband, inserted the elastic with my bodkin and then sewed the elastic in at each side seam.  Then I finished it up and top stitched the front waistband.  This was so much easier and I will do it that way from now on.

This is my new favorite shorts pattern and will be making several more this summer for both daughters!

Thursday, September 3, 2015

Climbing the Willow Izzy Top

Yesterday we went to a joint birthday party for both my neighbor's girls.  The oldest was turning 5 and the youngest 3.  I always like to make handmade presents for birthday gifts because 1. it saves me money and 2. it is fun to give a unique gift that people can't buy at the store.  For the younger girl I made the Frozen Fever Sophie dress blogged about below.  The older girl does not wear dresses and usually likes superheroes over princesses.  When I went over to their house to take their measurements I quizzed the girls on what they liked.  The oldest told me she loves Ariel because she swims (they are currently taking swimming lessons).  So, I decided to make her a top using a free pattern called Izzy from Climbing the Willow.  My original idea was to use Marvel Avengers fabric but she told me she loves Ariel so I used the new Ariel and Eric fabric from Springs Creative.


This was a super simple top to make and you can't beat a free pattern!  The directions were easy to follow too.  I made this top in a 4T and it took only 1 yard of fabric.  This pattern is perfect for a beginning seamstress because there are no set in sleeves or zipper.


The back bodice is split and there is a tab on one side that crosses over to the other side.  You can use a button/buttonhole or snap.  I choose to do a snap because it was easy and I had a snap color that matched.  I used KAM snaps on the top I made.


This morning I got a text from my neighbor and both girls were wearing the outfits that I made them to school today.  Looked like they both fit perfect too!

Monday, August 31, 2015

Frozen Fever Sophie Dress

Later this week is my next door neighbor's 3rd birthday.  Last week I asked her who her favorite princess was and she said "Anna from Frozen".  I happened to just get in new Frozen Fever fabric so I decided to make her a Frozen Fever dress.


Let's start with the fabric.  For the skirt, bodice front sides, bodice back and lining I used the brand new Disney Frozen Fever fabric from Springs Creative.  It features Elsa and Anna in the dresses they wore on the short Frozen Fever.  Olaf and little mini snowmen (which my daughter tells me were the result of Elsa sneezing) are also on the fabric.  The colors are vibrant and fun.  The fabric in the middle section is Michael Miller Fairy Frost in Lagoon.  Sorry I do not have this fabric in stock but bought it retail from a shop.

On the middle piece I embroidered a sunflower that matches the ones on Anna's skirt.  I used an applique design I bought from Lovely Leaf Applique on etsy.  I used the 4x4 size, which was perfect for this 2T dress.  I also used metallic gold piping on the bodice between the center and side pieces.  I purchased the piping at Hobby Lobby.


On the back I used a beautiful lace zipper.  Exposed zippers are so much easier to install than the traditional zippers and add a fun element to the dress.

Now for the pattern.  I used the Sophie dress pattern from Made for Mermaids.  The sleeves in the original pattern are 3/4 length.  I used her add on pattern for the sleeves shown and made the short sleeves with cuff.  This is one of my favorite patterns and with the add on pack there are tons of new options, making this a very versatile pattern.


Thursday, July 30, 2015

Ariel Ayda Dress


My niece's birthday was this month so I decided to make her a dress.  She is now 4 and is the most girly girl I have ever seen.  She is also crazy about Ariel.  Wish I had modeled pictures but since my girls are way too big for this dress (and I won't put it on my son to model) these photos will have to do for now.

The fabric shown is new from Springs Creative.  It features Ariel as a mermaid and human, Prince Eric, Sebastian and Ursula!  The colors are just  gorgeous too!  This is a cotton fabric and can be found HERE.  While you are there take a look at all the character fabric I have in stock.  I have many new ones including one with just Ariel, Cinderella, Tinkerbell and more.

I made this dress with the Ayda pattern from Simple Life Pattern Company.   You can make a peplum top or dress.  The skirt can be gathered or a circle skirt.  I chose to make a circle skirt.  I think it is much easier/quicker plus it provides tons of twirl.  Another option is for flutter sleeves but I chose to keep it simple and didn't add that.  This is a super easy and fast dress to make because there are no closures (no buttons or zipper).  The back overlaps as shown below.


There are also two options for the back.  The back as shown above or a more modest back that provides more skin coverage.  You can also add trim or lace or leave that off for an even quicker sew.  I decided to add lace to give a bit more coverage in the back and to make it just a bit more girly.  I got this lace at Joann and I thought it looked like it was crabs all along the lace.  Perfect for an Ariel dress that also features Sebastian!


Thursday, February 12, 2015

Rapunzel Outfit

A while back I won a $50 gift card to Spoonflower.  One of the things I bought was 1 yard of Rapunzel fabric from one of my favorite designers Heather Ross.  At the time I had no idea what I would make with it but I bought it to make something for my 10 year old.  As some of you know, 1 yard of fabric for a 10 year old doesn't go very far so my options were limited.  When I got the Potato Chip skirt pattern from the last Bundle Up I thought this was the perfect thing to make with that fabric since it doesn't take much fabric even for the larger sizes.


The skirt pattern will be available soon from Tie Dye Diva.  The Bundle Up is no longer available so if you want the skirt pattern you will have to wait a few more days and then you can buy it direct from her website HERE.  The skirt has a timeless A line shape with a flat front and elastic back.  It also has inset pockets with instructions to add piping.  This skirt is also reversible but I doubt she will wear it on the other side.  This fabric is too cute to hide.  I made another Potato Chip Skirt and blogged about it HERE.  There are more pattern details on that post.


After I made the skirt I thought "now what I am going to do for a matching shirt?".  I only had a small piece of the Rapunzel fabric left after making the skirt so I didn't have much to work with.  I decided to make a tank top using the Hip Hop Tank pattern by Love Notions.  I just love all of her patterns.  The directions are fantastic and the results are always perfect.  I did view C where the front is all knit, the back top portion is knit and the bottom back is woven.  The back looks like a button up shirt and is just so cute.  Luck was on my side and I had just enough leftover fabric to make a size 8 tank top with the button up feature.  The knit is solid cream knit from Purple Seamstress on Facebook.  I get all my solid knits from her.  I can't buy knit from Joanns anymore after using her knits.  The quality is much much better.


Here is a close up of the back detail.  You know what else is fantastic?  This pattern is also available in Women's sizes!  I am making myself a tank next.  I happen to already have it because I got it in the Women's Bundle Up from Pattern Revolution a while back.


Sunday, February 1, 2015

Lilly Giggle Cecille Pattern

I made my 3rd outfit from a pattern in Pattern Revolution's Bundle Up.  I made the Lilly Giggle Cecille as a dress.  I had never used a Lilly Giggle pattern before and found the instructions to be good and there were tons of options.  This pattern uses knit fabric or a combo of knit and woven for the dress.  You can make a shirt or a dress.  There are also 3 sleeve options (short, 3/4 and long).  There is also an option for a sash (waist band) with the dress.


I choose to do the dress version and incorporated knit with woven.  This can also be made with all knit.  I made short sleeves because in Southern California we really only have about 2 weeks when we can wear long sleeves.  For the fabric I used a blue snowflake knit I got on etsy a while back from another seller.  I got 1 yard and this is the 3rd thing I have made with it.  Knit really goes a long way.  For the neckband and sleeve cuffs I just used a solid white I got from Purple Seamstress on Facebook.  For the skirt I used Frozen Ice Skating Toss with glitter.  Usually I do not like fabrics that have glitter in them.  But, I actually like this one.  Due to the background color of light blue the glitter does not overtake the fabric but gives it nice sparkle.  I have it on sale for $7.99 right now too!  For the waistband/sash I used Fairy Frost in Cobalt.  This color goes perfect with the color of Anna's dress and breaks up the similar blue colors in the bodice and skirt.


The pattern has instructions to sew the sleeves flat (easiest) or in the round (harder but better finish).  I choose to do them in the round.  That way there weren't any uncomfortable seams at the cuff and the finish is more professional.  If I can find cute snowflake buttons I am going to put them on the sleeve cuffs.  She loves this dress and wore it all day today.  Even though she is 10 she is still majorly into Frozen.


Wednesday, January 28, 2015

Tie Dye Diva Potato Chip Skirt

My 7 year old loves My Little Pony so I decided to make her a skirt using the Potato Chip Skirt from Tie Dye Diva.  This skirt is available in the Bundle Up from Pattern Revolution.  This is the second pattern I have made from the bundle I bought and so far I have loved both patterns I have used.

What is so great about this pattern is you can make the skirt with either one fabric, lined or reversible.  I choose to make it reversible and used 2 My Little Pony fabrics.  That way she has 2 skirts in one!  The skirt also features pockets, a flat front waistband and elastic back.  It has a timeless A line shape and is super simple to sew because there are no gathers, ruffles, buttons or zippers!
For the main side of the skirt I used my favorite My Little Pony fabric called My Little Pony Names.  It features all your favorite My Little Ponies (including Rarity!) amongst a dark purple background.  There are so many colors you can pull from to match coordinating fabrics with.  I choose to bring out the pink and used Fairy Frost Love for the waistband.


On the front of the main side it features handy pockets.  You can even decorate the pockets with piping or in this case bias tape.  The pattern has directions for piping but I had this super cute crochet trimmed bias tape that I used to decorate the edge of the pocket.  I got this bias tape in a previous month's box from Stitch Box Monthy.  When I saw this pattern I knew this would be the perfect trim to use for the pockets!


On the reverse side I used My Little Pony Ombre fabric.  This is my daughter's favorite so I knew I had to use this fabric as well.  For the waistband on this side it is also the Fairy Frost Love.  The pattern includes directions to use a one fabric waistband (what I did) or a waistband with two different fabrics in case you wanted a different fabric on each side of the reversible skirt.


This skirt was a quick sew and I will be making more!


Tuesday, January 27, 2015

Jocole Wideleg Pants

First let me apologize for the horrible photos.  It was 2 minutes before time to leave for school so I didn't have much time.  It also rained here all day yesterday and was still gloomy outside, thus the inside quick photos.

Right now there is a pattern bundle sale going on at Pattern Revolution.  There are 11 brand new girls patterns for sale and you can get them starting at $4.50 each.  But you must pick at least 6.  The more you buy the more you save.  I ended up buying 9.  I sat down with my girls and they liked just about every one of them.  They are super picky these days so when they like something I go for it.  They are not into big frilly ruffle dresses anymore (which is fine with me) and are more into the ready to wear look that you would find at stores.

The first pattern I decided to sew up was Jocole's Wideleg Pants for my 10 year old.  Now she is super duper skinny but average height for her age.  So, it is hard to find pants that actually fit her.  She can fit into her little sister's pants but they are always short.  If she wears pants that are long enough for her they always fall off of her.  It is nice to be able to sew her pants and change it up for her measurements.  I made a size 8 but extended the length a little bit.  I probably could have even made a smaller size since her waist was measuring smaller but I didn't want the rise to be too short.  I used a stretch french terry knit that I had originally bought for my son but decided to make these pants instead. 


I choose to add inset pockets.  Next time I make them I am going to serge around the curve of the pockets before I construct them.  I found it impossible to do this with my serger when the directions stated to do it so I just left the seam raw.  Since it is knit it won't fray.  I could have easily done it with a zig zag stitch but after using a serger for so long I don't like the look of a zig zagged seam very much.  When you are putting the pockets on make sure you pay attention and put them on the top of the pant leg where they belong and not the bottom (don't ask me why I know this).

For the waist I choose to do the skinny band.  I decided to also put elastic inside to give it more stability and so they wouldn't fall down.  I just left a gap when I attached the band and then inserted the elastic.  Then after securing the elastic together closed the gap.  I topstitched it with my coverstitch and it looks like I need more practice with that.  I have only had it a month so I have much to learn!


Finally, I hemmed it with my coverstitch as well.  I love the way this looks!  I used 1" fusible hem tape, ironed it up and hemmed it with my coverstitch.  Easy peasy.


The bundle up sale is going on only until Febuary 2nd.  You can find it HERE.  Happy sewing!


Saturday, January 17, 2015

Frozen Outfit


This past week I participated in a sew along in the Made for Mermaids facebook group and made this top.  It is the rose ruffle top made with knit fabrics.  This was really easy to make, especially with my new coverstitch machine.  I don't sell knit fabrics (yet anyways) so I bought the fabrics used in the top retail.  The white is from Purple Seamstress, whom I think is just awesome.  This is the highest quality solids I have seen and reasonably priced.  The snowflake knit I got on etsy from another seller.


The hem on both the sleeve ruffles and the shirt hem I did with my Janome coverstitch machine I got for Christmas.  A coverstitch is different from a serger because it doesn't have a knife to cut off fabric and has double straight lines on the front and chain stitch on the backside.  This stitch still allows the fabric to stretch so it is the ideal way to hem knits.


I also made a coordinating skirt.  I used the Katie John pattern from Cole's Creations.  For the fabric I used Frozen Ice Skating Toss and Fairy Frost in Cobalt.  I have the Frozen fabric on sale right now!  This skirt has a flat front with elastic back, pockets and a contrasting hem band.  I hope the birthday girl loves her new outfit!


Saturday, December 27, 2014

Giveaway!

It's time for a giveaway!  Enter the rafflecopter giveaway below to win one of 3 prizes.  You can win a $25 gift certificate to the website or my most popular baby blanket kit (Karavan) or 2 yards of Frozen fabric!  Starts now and ends at midnight on Jan 4th.


a Rafflecopter giveaway

Thursday, December 11, 2014

FREE SHIPPING on US orders over $50!!!!

I am pleased to announce that I now offer FREE domestic shipping on all orders over $50. Shipping on the website is a little different then before. For US addresses it will automatically be free when you spend over $50 in merchandise. On etsy I am also offering free shipping but you must use the coupon code "freeship" at checkout. To get the free shipping on etsy you must remember to use the coupon code at checkout. I will not be refunding shipping if the coupon code is not used.
International customers: sorry due to the high cost of shipping internationally I am not able to offer free shipping at this time. The shipping costs are now by value of your order instead of how they were before. This may result in a higher shipping charge then it should be (it is very difficult to do international shipping by value and get an accurate price). Don't fret, if shipping charges you paid is more than $2 over my actual cost of postage you will be refunded the difference when your order ships.
To visit the website click HERE
To visit etsy click HERE

Saturday, December 6, 2014

Lazy Susan Frozen Dress!


I made this dress for a 2 year old relative that loves Frozen.  It is going to be a Christmas gift so hopefully the mom does not see this!  But, I just had to share because I love how it came out.

Last week I got a shipment of brand new Frozen fabric.  I had pre-ordered them several months ago so there was lots of anticipation in this house waiting for these fabrics to arrive.  Frozen is very very popular here.  My girls were excited to finally get these fabrics and wanted me to make stuff for them right away.  But, I told them I have to get Christmas gifts done first.


Now for the details!  I made this dress using the Lazy Susan pattern from Brownie Goose.  I did the split bodice and skirt hem band options on this dress.  The directions to do this are included but the skirt hem band requires a little bit of simple math.  For the fabric I used Frozen Ice Skating Hearts Framed and the accent fabric is Michael Miller Fairy Frost in Fancy.  These two fabrics pair together perfectly!

The back of the dress has buttons.  My original plan was to do use fabric covered buttons using the fairy frost fabric.  But, all I had was 1/2" and 7/8" buttons on hand.  I tried to cover the 1/2" ones but I have always had a hard time with that size and it wasn't working for me again.  All I ended up with were sore fingers.  3/4" would have been perfect but I didn't feel like going to the store.  So, plan B was to use wood buttons that I have in my stash.  I bought a bunch of these and usually use them on my son's button up shirts.  I think they look OK because they kind of match Anna's hair.  I would have preferred a fancier button.  But again, I did not feel like packing up my 3 year old and going to the fabric store so these will just have to do!


Sunday, November 30, 2014

Made for Mermaids Sophie Dress


I just love the newest pattern from Made for Mermaids.  I have already made 3 of them.  This one pictured I made for my 3 year old niece for Christmas.  I made this using the Sophie pattern.  It can be purchased here. 

This dress has several different options.  First, you can choose between 3/4 length sleeves or long sleeves.  I made this one with 3/4 length sleeves.  The center of the bodice is the perfect backdrop for embroidery.  I used a Disney princess design of Aurora from a Brother card for my embroidery machine.  For this design you must have a Brother machine that can use Disney embroidery cards.  I purchased my machine and this card almost 8 years ago so I don't know if this card is available for purchase anymore.  I choose to do a flat piping on the bodice and the instructions for that are also included in the pattern.


For the back there are 3 different options for closures.  The options are buttons, zipper, or exposed zipper.  I did an exposed lace zipper on this dress.


Now for the details on the fabric used.  For the main fabric I used a brand new Disney Princess fabric called I Am Princess.  It can be found on my website here.  For the center of the bodice (white) I used Michael Miller Fairy Frost in Snow.  It is white with a subtle shimmer to it and is a great back drop to the embroidery.  For the flat piping on either side of the bodice I used Riley Blake's Floriography Branches in Pink.  The zipper I bought on etsy from a shop called Fabricmade.  She is located in China so it took about 2 weeks to get in the mail.

Sunday, November 9, 2014

Halloween Costumes, Frozen Style


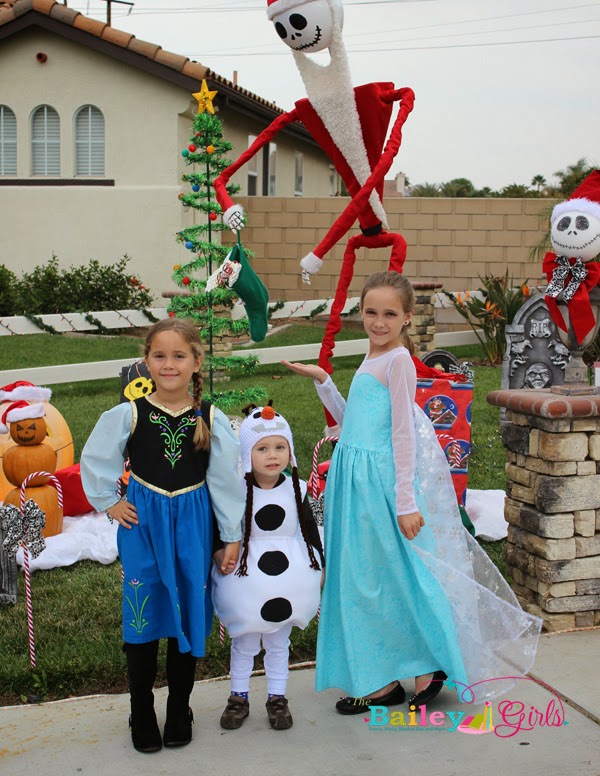
I know it is a little late to be sharing Halloween costumes.  But, considering the extreme popularity of anything Frozen these costumes would also make excellent Christmas gifts for dress up play for the Frozen obsessed.  I made everything shown above, with the exception of the Olaf hat.


I will start with Elsa first.  For the pattern I used the Create Kids Couture Elise pattern in the tween sizes. They also offer this pattern in girls, women, and doll sizes.  I made the size 7/8 and added length.  I would say the sizing is spot on for the size I made.  Each fabric used in this was from a different source.  For the main blue fabric I used Michael Miller Fairy Frost in Caribbean.  I sell it in my fabric store and it can be found here.  A lot of people were using satin for their costumes and I absolutely hate working with satin.  What is so great about Fairy Frost fabric is that it is cotton so it is easy to sew with but still looks fancy at the same time!  This color is perfect for Elsa.  For the sheer knit on the top of the bodice and sleeves I used a fabric I found at Hobby Lobby.  It has small circles of silver sparkle all over it.  It was kind of a pain to sew with but it turned out great.  The cape fabric I found at Joanns and I got lucky finding it.  I bought it probably a month and a half before Halloween and it was jammed in between 2 other fabrics hiding in the wrong section.  It is an organza with silver foil snowflakes on it.


Next is Anna.  I made this dress way back in April for her birthday.  She loves it so much that she literally would wear it as soon as it was clean.  For the summer I made her a short sleeve peasant top to go underneath.  I just used plain boring Kona cotton for this one as I made this before I started carrying Fairy Frost fabric.  But, I have made this same dress using Fairy Frost fabric and the results are stunning.  I have made it easy for you and now offer a kit to make an Anna dress here.  The embroidery designs on the bodice and the skirt are both from Frou Frou by Heather Sue.


Now for Olaf.  I decided to go the route of a crochet hat rather then the type that you see with the mass produced Olaf costumes you could find at Wal-Mart.  This way he could wear the hat more then once.  Maybe there will be a few days here in California that will warrant wearing a hat this winter and he could wear it again.  Since I do not know how to crochet I bought the hat on etsy from this wonderful shop.  The hat's craftmanship is fantastic and her service was excellent.  I bought the hat way back in September (I was planning ahead for once) and at the time I didn't know what I was going to do for the rest of the outfit.  Then peek-a-boo patterns came out with a free tutorial for the body!  I had to upsize it to a 2T but it was not difficult at all.  For the brown undershirt I used Patterns for Pirates deep sea v neck shirt.  I love her patterns and now this brown shirt is used for pajamas paired with Olaf flannel pants.  The white pants were made using the pants pattern from the Alex and Anna pajama pattern also by Peek-a-Boo patterns.


Sunday, September 7, 2014

It All Goes Here Sewing Organizer

If you are like me and are constantly losing your important sewing notions when you most need them then this sewing project is for you!  I decided to try and be a little more organized so I would quit searching all over my sewing room for things like my seam ripper when I most need them and made myself this sewing organizer.  I used the It All Goes Here! Sewing Organizer pattern from Fishsticks Designs.

 
This pattern is from their Go Fish series, which is very simple patterns which sew up quick and are perfect for beginners.  I have also made several On the Go travel pillows from the Go Fish series.  These pillows are my go to when I need a quick birthday present for one of my kids' friends.
 
 
The sewing organizer features 8 pockets along the front of various sizes to store all your goodies.  On the left side is a loop that you can tie your small scissors to with ribbon to keep them handy for thread snips.  The right side features a handy magnetic pin catcher.  The organizer has a pocket and you slip a ceramic magnet inside.


When I first read the pattern and saw I needed a ceramic magnet I thought "where the heck am I going to find one of those?"  After a quick google search I found that Home Depot sells them.  So, I tagged along with my husband on his next Home Depot run and found these magnets in the same aisle as all the screws, nuts and bolts.  They came in a 2 pack for around $4.
 
 
This organizer was super easy to make and sewed up very quick.  I think the whole thing took around 45 minutes to make.  Now my daughter is begging me to make her one for her sewing machine.  She is 9 and might be able to make it herself with my help with the instructions.  She has already picked out her fabric for hers. 
 
 I used Heather Bailey's Lottie Da Sprig fabric for the front pocket, Heather Bailey's Lottie Da Butterfly Dot for the top of the pocket and magnet cover and Ta Dot in Lime for the mat.


Sunday, August 31, 2014

EYMM Zander Jacket

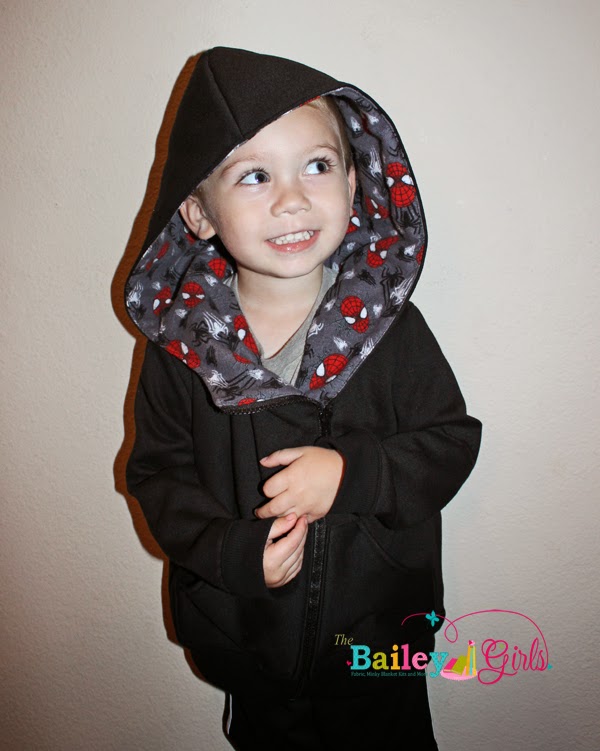
My poor son usually gets neglected when it comes to sewing clothing for him.  It is so much harder to find cute patterns for boys.  So, when I saw the newest Bundle Up from Pattern Revolution with all boys patterns I knew I had to get it.  This jacket is the second thing I have made from the bundle and is probably one of my most favorite things I have ever made.  This pattern is only available though Bundle Up through tomorrow but will be available to purchase from the designer on September 10th.  The designer is Everything Your Mama Made and this is the first pattern of hers I have ever made.


When I was planning out making this jacket I intended to make a Star Wars theme and embroider Darth Vader on the back.  But, I made the mistake of taking my son with me to the fabric store and he begged me for Spiderman.  He is currently obsessed with Spiderman and wears something Spiderman just about every day.
 
 
I made this jacket with black sweatshirt fleece and lined it in Spiderman flannel.  The pattern calls for a knit lining but flannel worked just fine.  I made a size 2/3 and it is a little bit big on him since he is so tiny.  But, it will last a long time.  I appliqued Spiderman's head on the back of the jacket and it matches perfectly with the Spiderman design on the flannel.  What is so unique about this jacket is the asymmetrical zipper.  When I showed my husband he said "the zipper is crooked".  I told him it is supposed to be and he didn't get it at first but he is a man so you will have to forgive him.  You must use a separating zipper and I choose to use a sport zipper because I liked the look of the bigger zipper teeth.  The supplies for the whole jacket cost me around $20.


Hopefully he will get lots of use out of this jacket this coming Fall and Winter.  Where I live it doesn't get very cold so he can probably wear this throughout the whole "cold" season.  I am very pleased with the way this came out and now my daughters are begging me to make them both one too.  Of course they do not want Spiderman but are requesting Elsa and Anna jackets.


The Bailey Girls Copyright © 2014 Designed by Katie Blogger Template Sponsored by My Little Monsters